Fastlane Android Mobile App Deployment
Learn how to speed up the Android app deployment process with Fastlane. Discover tips and best practices for simplifying and automating your mobile app release process.
What is Fastlane?
Fastlane is an open-source platform that aims to simplify the daily bases of mobile programmers by offering us new ways of making Android and iOS deployment less painful. Essentially it lets you automate every aspect of your development and release workflow and spares you hours of work, either bumping versions or uploading your applications to stores.
Fastlane advantages
Some of Fastlane's functionalities and advantages include:
- Automatically generate the needed screenshots for you to upload your apps to the stores.
- Easily distribute beta builds for testers and automatically submit new versions of your app for review.
- Publish new releases to the app store in seconds and with minimum effort.
- Automating the most time-consuming beta distribution steps including incrementing the build version, code signing, building and uploading the app, and setting a changelog.
- Support for over 15 beta testing services including TestFlight, Crashlytics Beta, Play, and Hockey.
- Freely switch between beta services without needing to reconfigure Fastlane.
- Create a repeatable custom workflow to build, upload and distribute new releases to the app store with things like GitHub actions or GitLab ci/cd.
- Deploy from any computer.
Implementing android app deployment in a react native project using Fastlane and GitHub
So now that we've seen what Fastlane is and what it does, let us skip to the most important part, how to use it. And in this case, we will implement it with the support of GitHub actions!
Create a Google Developers service account
First, to be able to deploy to the store, we need to have a "Google Developers service account", if you don't have one, create one. Then export the credentials so we can be able to automate the process.
- Open the Google Play Console.
- Access Account Details and get your Developer Account ID.
- Go to the Google Cloud Platform and create a new service account.
- Name your service account and check if your "Developer Account ID" matches the one on the light gray text in the second input, preceding .iam.gserviceaccount.com. If not, open the picker in the top navigation bar, and find the one with the ID that contains it, the description is optional.
- Select a role, then find and select Service Account User (under service accounts), and proceed.
- Under "Service Accounts" click on the actions vertical three-dot icon of the service account you just created and select manage keys on the menu.
- Create a new key (make sure JSON is selected as the type), and once you’re done with it a file will automatically be downloaded for further use in your project.
- Return to the Google Play Console tab and click on "Manage Play Console permissions" on the new service account (refresh the page if it's not showing up).
- Choose the permissions you'd like the account to have, for this tutorial I recommend the Admin (all permissions), but you should manually select the appropriate checkboxes for your project, you may leave out some of the Releases permissions, such as "Release to production" for example. At the end click “Invite user” to finish.
Setting up Fastlane
Firstly we will have Fastlane installed on our machine. Since I'm using macOS, I will be using:
1brew install fastlaneFor "macOS/Linux/Windows" you should be using the following command, but check the Fastlane docs (https://docs.fastlane.tools) for more info on how to install.
1sudo gem install FastlaneWith this, we will navigate to our android project and initialise Fastlane.
1cd android
2fastlane init
A prompt will show up where you need to follow these steps:
- Provide the package name for the application when asked (e.g. com.my.app), which can be found in your AndroidManifest.
- Press enter when asked for the path to your JSON secret file, we will deal with that right after.
- Answer 'n' (no) when asked if you plan on uploading info to Google Play via Fastlane (we will also set this up later).

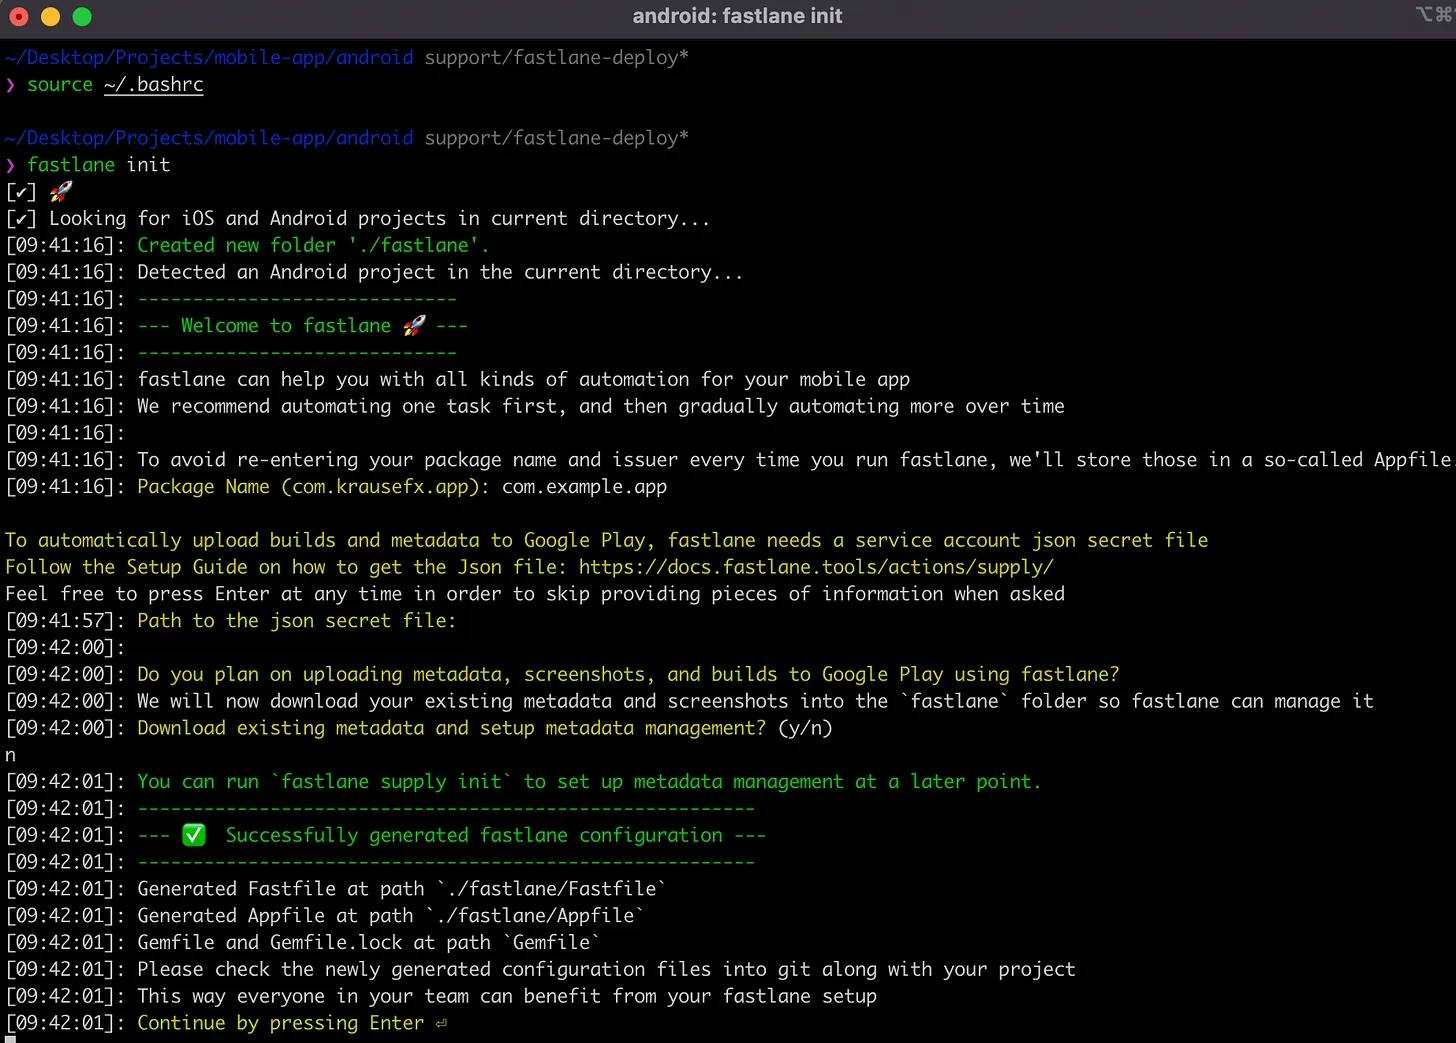
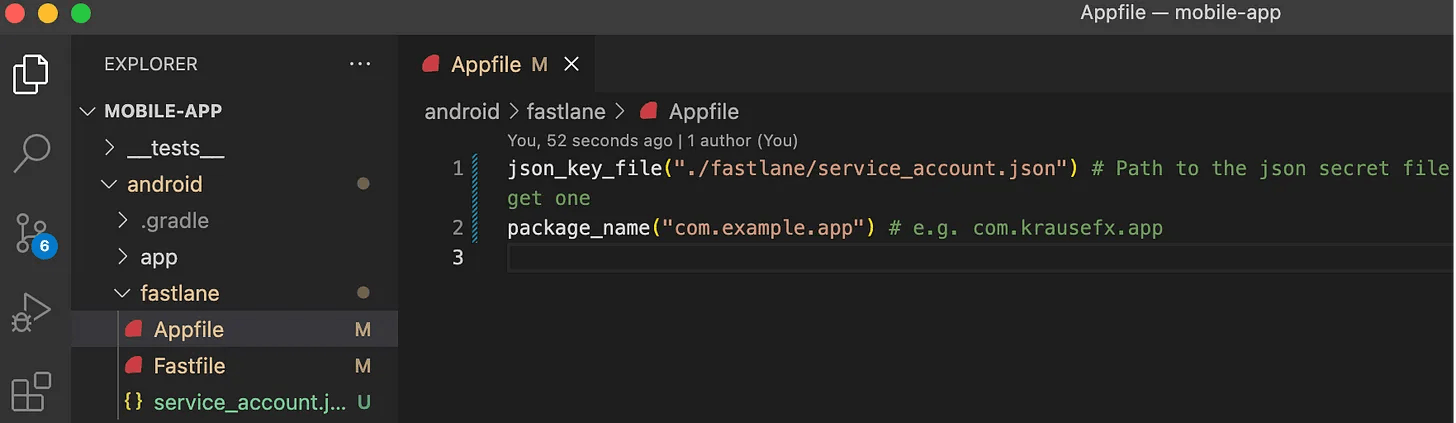
Once it's finished, you should have a `Fastlane` folder within the android one (android -> Fastlane), after that, you will proceed to include the service account file you created in the last step (you may want to rename it). And then change the "Appfile" json_key_file to the service account file path.

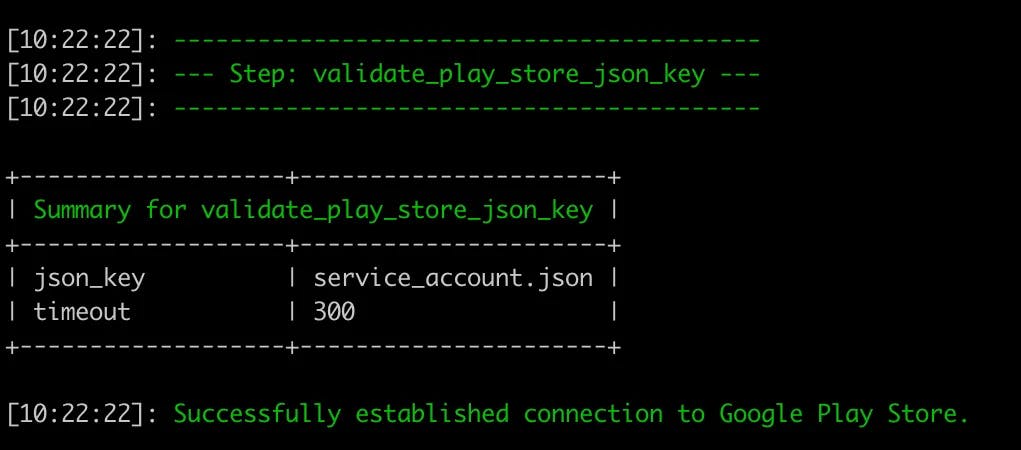
In addition, under the Fastlane folder, you can validate your service account file by running the following command.
1fastlane run validate_play_store_json_key json_key:your/path/service_account.json
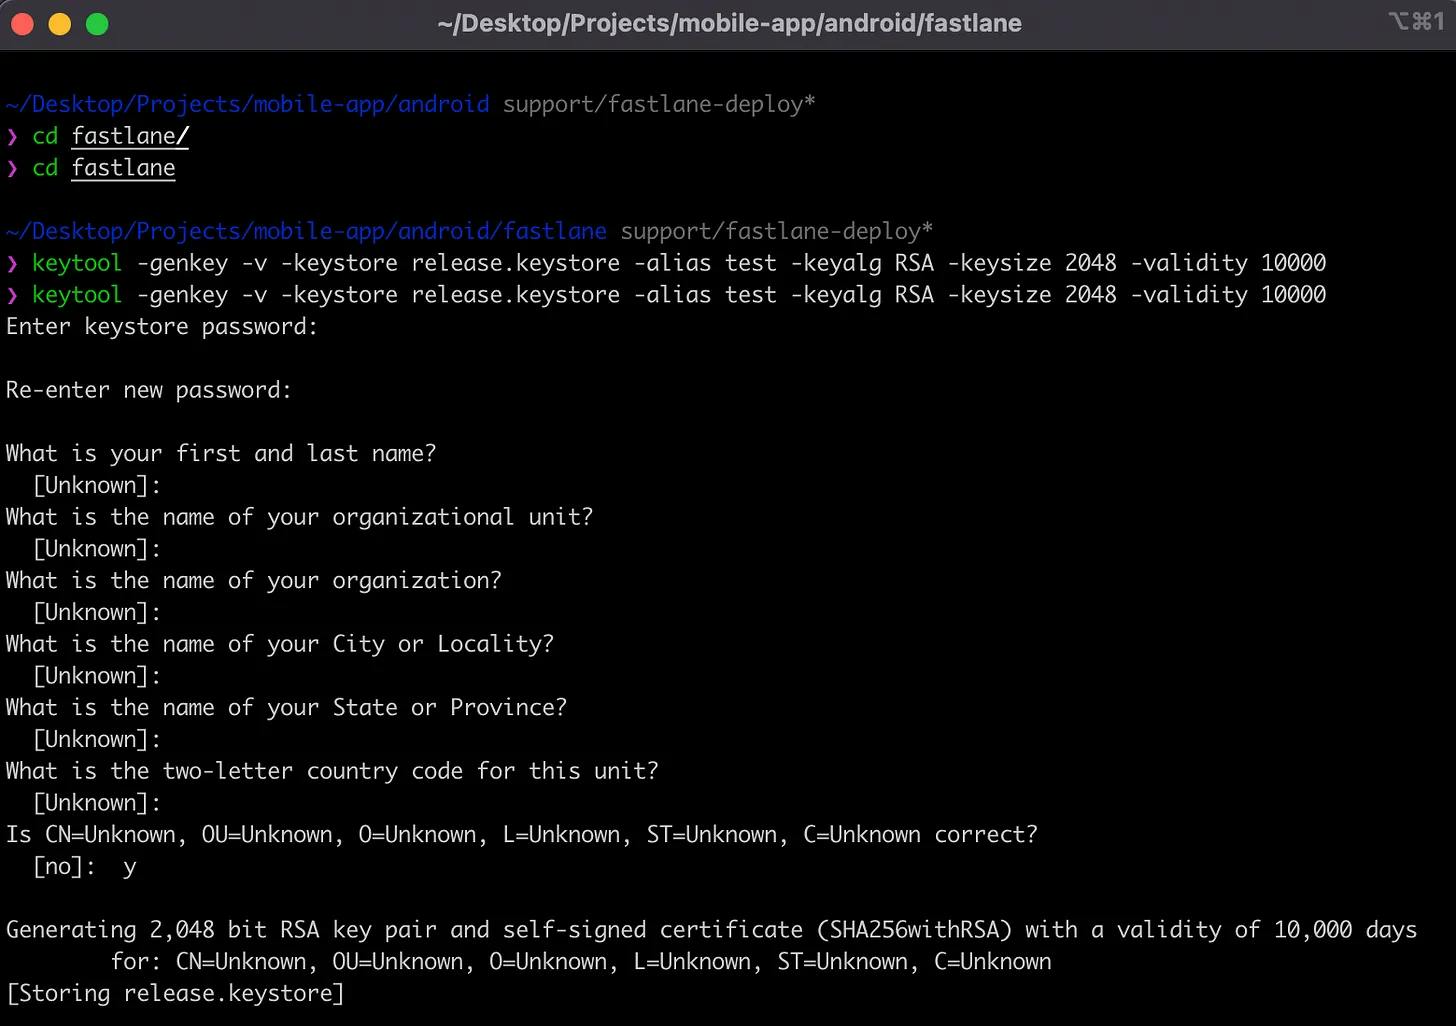
We will also need to generate a Keystore file in order to sign in the app (if you use Android App Bundles, you need to sign the app bundle before you upload it to the Play Console), and for that, we will use the keytool command.
1keytool -genkey -v -keystore release.keystore -alias <your key alias> -keyalg RSA -keysize 2048 -validity 10000A prompt will show up where you need to set the keystore password. There will be a set of questions that you should fulfil accordingly to your project, for this tutorial I will just leave them empty. Answer 'y' (yes) at the end.

Setting up the necessary plugins
We will also need to include two plugins that will help us:
- Retrieving the version number of the application from the package.json file, which will define the version number of the Android App Bundle.
1fastlane add_plugin load_json
2> Should fastlane modify the Gemfile at path '/xxx/react-native-app/android/Gemfile' for you? (y/n)
3> y (answer yes here)- Setting the version code of your app.
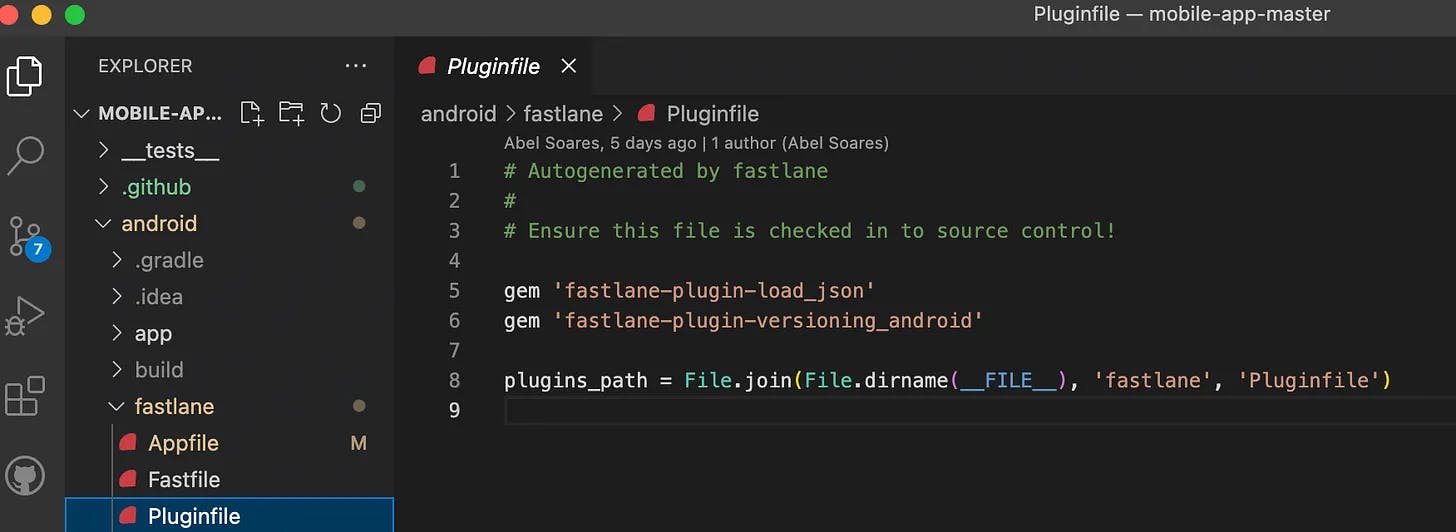
1fastlane add_plugin versioning_androidWith this, a Pluginfile will be created under Fastlane. Further on, if you face any problems regarding detecting the plugins you may want to add this line as well.
1plugins_path = File.join(File.dirname(__FILE__),'fastlane','Pluginfile')
Setting up the Fastfile
Now that we have Fastlane ready we will proceed to write some code to automatically build and deploy our application to the stores. And for starters, we will set our default platform (android in this case) and write a function that generates a unique versionCode for the Android App Bundle.
Instead of managing the version code manually it is based on a timestamp in seconds where any build done more recently is considered to be a higher version, and the versionCode is increase every minute (so max 1 build per minute) and cannot be smaller than the legacyVersionCode.
1default_platform(:android)
2
3def getVersionCode
4  thirtySeptemberTwentyTwenty = 1601480940 / 60
5  legacyVersionCode = 10902
6  versionCode = legacyVersionCode +
7  (Time.now.to_i / 60) - thirtySeptemberTwentyTwenty
8
9  if versionCode > 2100000000
10    raise "versionCode cannot be higher than 2100000000"
11  end
12
13  versionCode.floor()
14end
Fastlane works with "lanes", where each lane will have a set of actions to execute, and our first lane (bump_build_number) will be accountable for using our last function to update android.defaultConfig.versionCode in the app/build.gradle.
1platform :android do
2    desc "Increments internal build number tracking"
3        lane :bump_build_number do
4            android_set_version_code(
5            version_code: getVersionCode()
6        )
7    end
8...
With that said and done, we will start to build our playstoreInternal lane by retrieving the application version from the package.json file (in the react native case).
1...
2    desc "Build and upload the app to playstore"
3        lane :playstoreInternal do |options|
4        package = load\_json(json\_path: "../package.json")
5...
Then we clean up the build folder and use the bump_build_number lane created above.
1...
2    gradle(
3      task: "clean"
4    )
5
6    bump_build_number
7...
Finally, we define a gradle task to build the application in the app/build.gradle file.
1...
2    gradle(
3      task: 'bundle',
4      build_type: 'Release',
5      properties: {
6        "android.injected.signing.store.file" => Dir.pwd +                        "/release.keystore",
7        "android.injected.signing.store.password" => options[:RELEASE_KEYSTORE_PASSWORD],
8        "android.injected.signing.key.alias" => options[:RELEASE_KEYSTORE_ALIAS],
9        "android.injected.signing.key.password" => options[:RELEASE_KEYSTORE_KEY_PASSWORD],
10        "vname" => package["version"]
11      }
12    )
13...
Four different properties are needed to allow gradle to sign our application:
- android.injected.signing.store.file: Path to the release.keystore file.
- android.injected.signing.store.password: Keystore password.
- android.injected.signing.key.alias: Key alias of the release.keystore file.
- android.injected.signing.key.password: Key password.
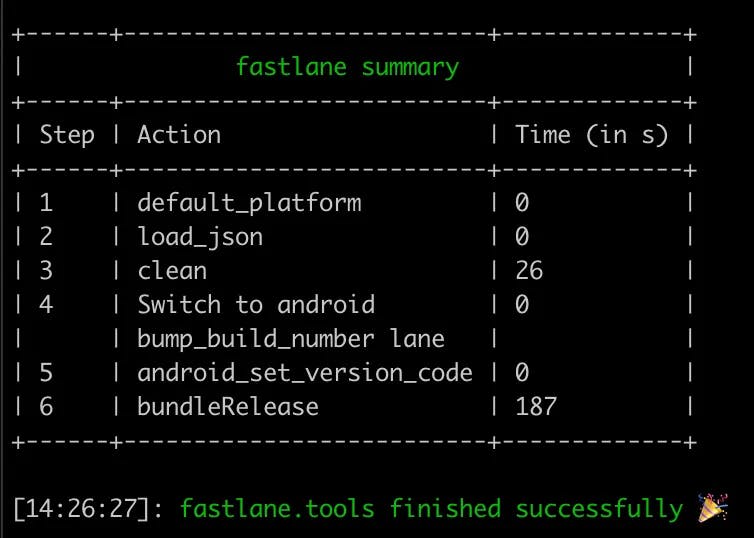
To check if everything is running properly so far you can then execute the following command:
1fastlane android playstoreInternal RELEASE_KEYSTORE_PASSWORD:keystorePassword RELEASE_KEYSTORE_ALIAS:keyAlias RELEASE_KEYSTORE_KEY_PASSWORD:keyPasswordIf everything checks up you should get something like this:

Later on, we will add this line for store deployment.
1...
2    upload_to_play_store
3  end
4end
In the end, your file will look something like this:
1default_platform(:android)
2
3def getVersionCode
4  thirtySeptemberTwentyTwenty = 1601480940 / 60
5  legacyVersionCode = 10902
6  versionCode = legacyVersionCode + (Time.now.to_i / 60) - thirtySeptemberTwentyTwenty
7
8  if versionCode > 2100000000
9    raise "versionCode cannot be higher than 2100000000"
10  end
11
12  versionCode.floor()
13end
14
15
16platform :android do
17  desc "Increments internal build number tracking"
18    lane :bump_build_number do
19      android_set_version_code(
20      version_code: getVersionCode()
21     )
22  end
23
24  desc "Build and uploads the app to playstore"
25    lane :playstoreInternal do |options|
26    package = load_json(json_path: "../package.json")
27
28    gradle(
29      task: "clean"
30    )
31
32    bump_build_number
33
34    gradle(
35      task: 'bundle',
36      build_type: 'Release',
37      properties: {
38        "android.injected.signing.store.file" => Dir.pwd + "/release.keystore",
39        "android.injected.signing.store.password" => options[:RELEASE_KEYSTORE_PASSWORD],
40        "android.injected.signing.key.alias" => options[:RELEASE_KEYSTORE_ALIAS],
41        "android.injected.signing.key.password" => options[:RELEASE_KEYSTORE_KEY_PASSWORD],
42        "vname" => package["version"]
43      }
44    )
45
46    upload_to_play_store
47  end
48end
49
Setting up the GitHub actions
For the GitHub actions, we will start by creating a folder named .github, and inside that folder another one called workflows, where you will create your yml file that will hold the actions.
First, we start by naming the flow and setting when it will run, in this case, it will run every time we make a pull request regarding the branches developer and master.
1name: Deploy
2
3on:
4  pull_request:
5    branches:
6      - development
7      - master
After this we will set our jobs, each job has a maximum run time, where it will run, and all the dependencies needed to execute our Fastlane lane within GitHub. Each step will have a name, a docker image (uses), and might have some extra specifications (with), some may have to run some extra commands to set them up correctly.
1jobs:
2  build:
3    timeout-minutes: 20
4    runs-on: ubuntu-latest
5
6    steps:
7      - name: Checkout code
8        uses: actions/checkout@v2
9
10      - name: Setup node
11        uses: actions/setup-node@v3
12        with:
13          node-version: 16
14
15      - name: Setup Ruby 2.7.4
16        uses: ruby/setup-ruby@v1
17        with:
18          ruby-version: '2.7.4'
19          bundler-cache: false
20        env:
21          ImageOS: macos1015
22
23      - name: Setup JDK 11
24        uses: actions/setup-java@v2
25        with:
26          java-version: 11
27          distribution: adopt
28
29      - name: Setup Android SDK
30        uses: amyu/setup-android@v1.1
31
32      - name: Install packages
33        run: |
34          yarn
35
36      - name: Setup module dependencies cache
37        uses: actions/cache@v2
38        with:
39          path: node_modules
40          key: ${{ runner.os }}-modules-${{ hashFiles('**/yarn.lock') }}
41
42      - name: Install module dependencies
43        run:  yarn install --frozen-lockfile
44
45      - name: Install Fastlane
46        run: gem install fastlane
47      ...
In this case, we will need:
- Actions dependencies.
- Node setup.
- Ruby setup.
- JDK and Android SDK setup.
- Package installation.
- Module dependencies cache setup.
- Fastlane installation.
And the lane execution that we already tested beforehand.
1      ...
2      - name: Build and Publish Mobile App
3        run: |
4          cd android
5          fastlane android playstoreInternal
6          RELEASE_KEYSTORE_PASSWORD:keystorePassword
7          RELEASE_KEYSTORE_KEY_PASSWORD:keyPassword
8          RELEASE_KEYSTORE_ALIAS:keystoreAlias
Encrypting sensitive information
Now, something that we need to take into account is that both the release.keystore and the services account JSON will be pushed into git and contain sensitive information, so the best practise is to encrypt these, and for that, we will use GnuPG and GitHub secrets!
To start off we install GnuPG.
1brew install gnupgAnd then encrypt the files inside the Fastlane folder by running the following commands and entering a password for each.
1sudo gpg --symmetric --cipher-algo AES256 release.keystore
2sudo gpg --symmetric --cipher-algo AES256 service_account.json 
Once this is done two .gpg files will be added to your project.
To ensure that your shell script is executable before checking it into your repository also run the following commands:
1sudo chmod +x service_account.json.gpg
2sudo chmod +x release.keystore.gpg
In the end make sure you delete these files:
- service_account.json
- release.keystore
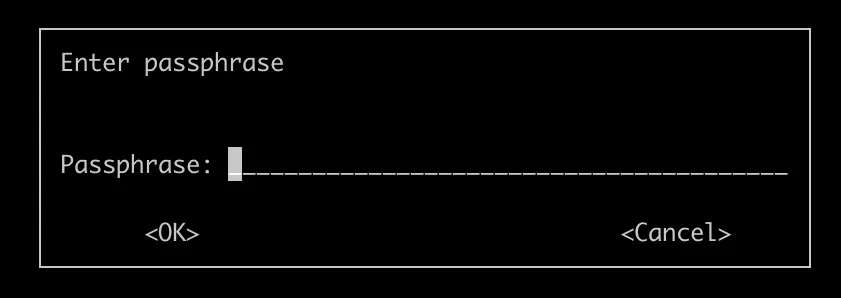
If you run into any problems regarding the GPG pinentry module be sure to follow these steps:
1brew install pinentry
2which pinentry
Then copy the path and change the one on the following file.
1nano ~/.gnupg/gpg-agent.confLastly, run the following command and you will be ready to go.
1gpgconf --kill gpg-agentAdding GitHub secrets
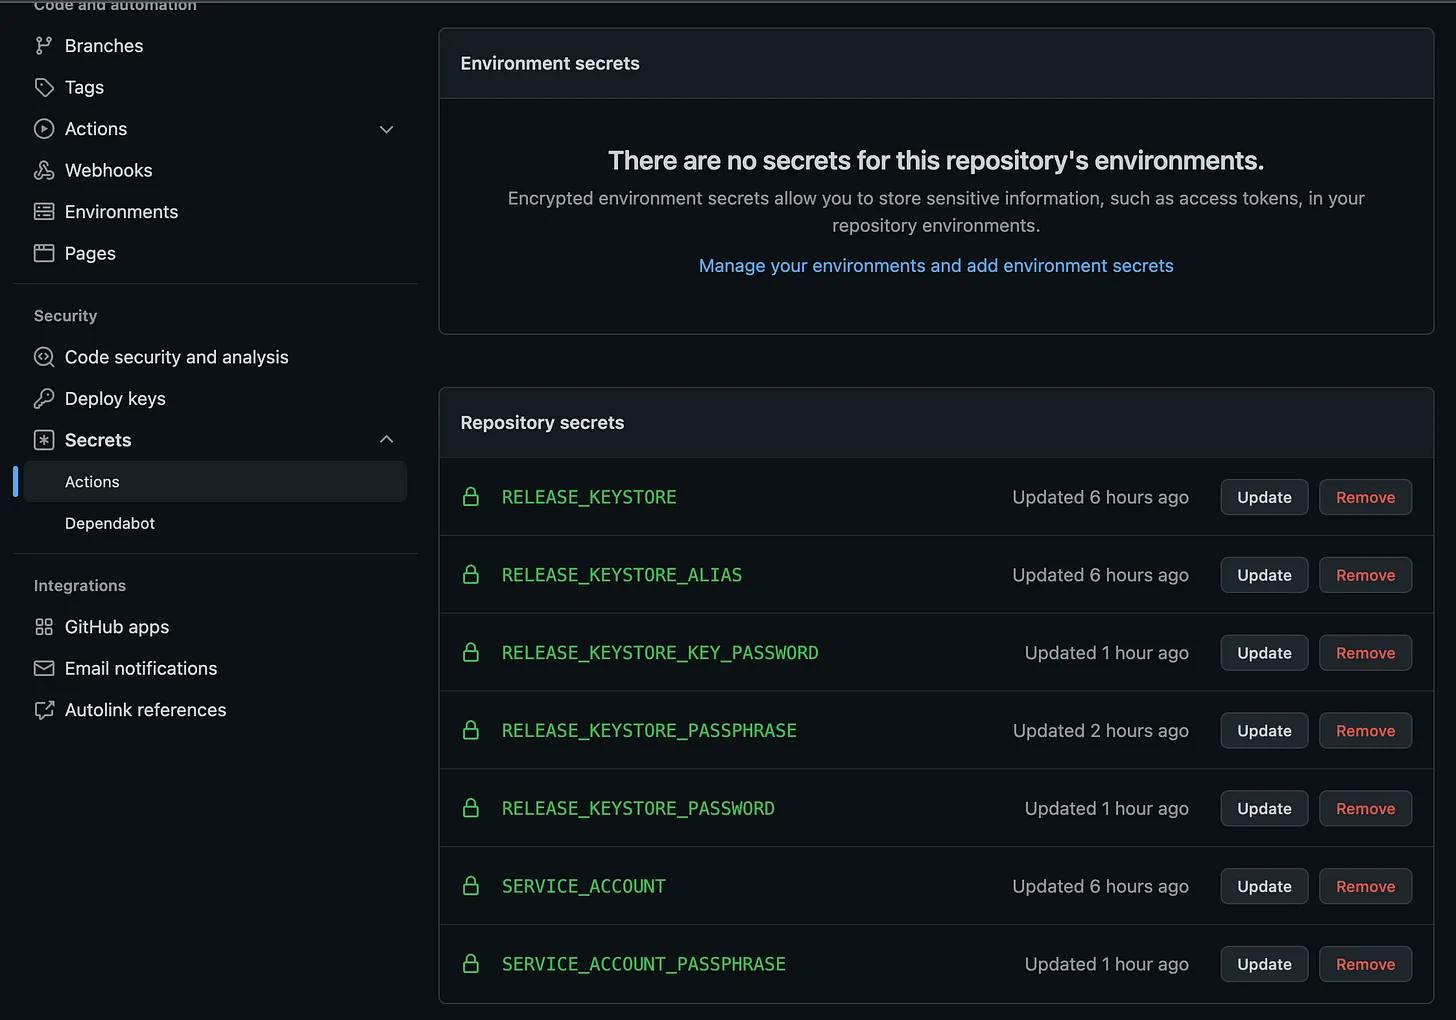
At GitHub, we will need to create 7 different secrets. For that go to Settings and then on the left side menu go to Security -> Secrets -> Actions.
For the files simply copy and paste the content, as for the rest, just type the passwords and the alias.

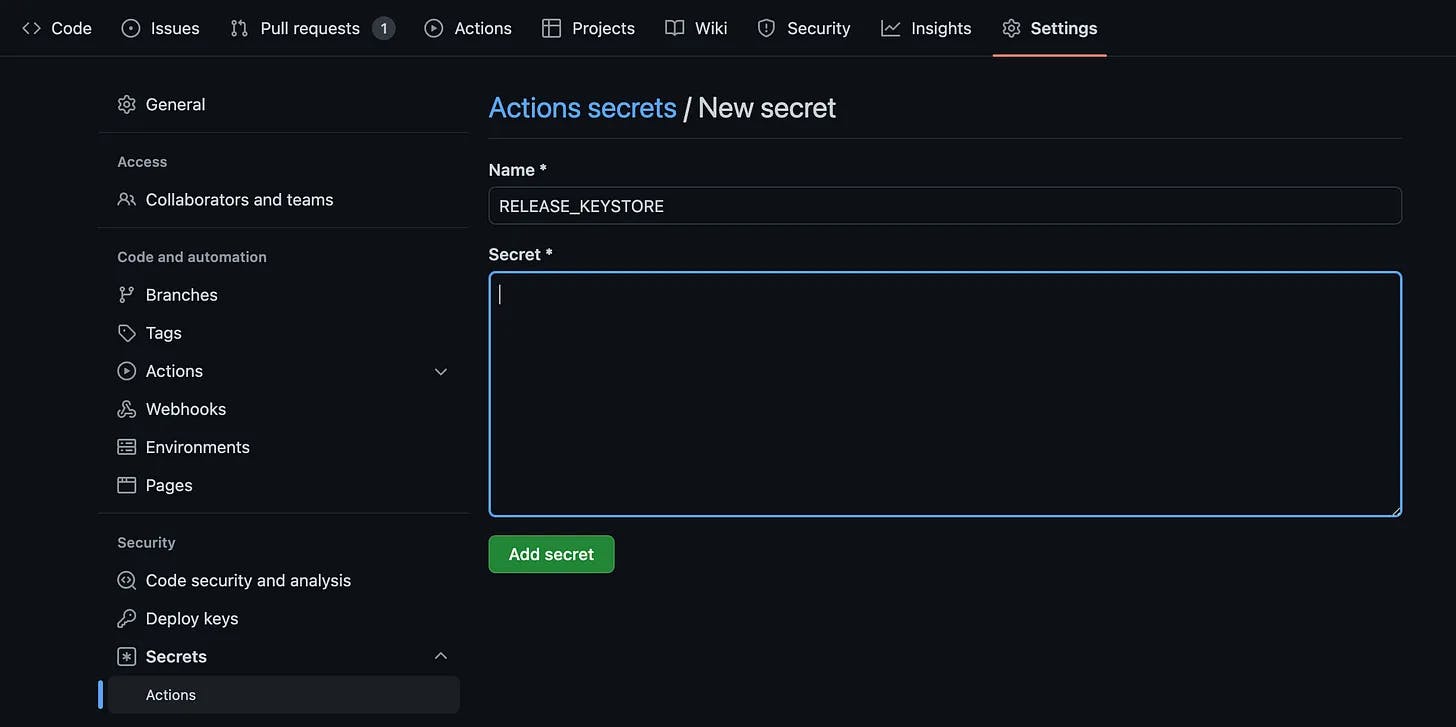
For the release.keystore file we will need:
- Content of release.keystore.gpg.
- Alias of the file.
- The Key password of the file.
- Passphrase for decrypting the file (GPG Password).
- The password of the file.
And for the service_account.json we will need:
- Content of service_account.json.gpg.
- Passphrase for decrypting the file (GPG Password).

Adding the script to decrypt the variables
Now like we did for the GitHub actions we are going to create a folder named "scripts" inside the ".github" folder. This is where we will add our "decrypt_android_keys.sh" file.
And where we will include the necessary commands for GPG to decrypt the .gpg files.
1gpg --quiet --batch --yes --decrypt --passphrase="$RELEASE_KEYSTORE_PASSPHRASE" \
2--output android/fastlane/release.keystore android/fastlane/release.keystore.gpg
3
4gpg --quiet --batch --yes --decrypt --passphrase="$SERVICE_ACCOUNT_PASSPHRASE" \
5--output android/fastlane/service_account.json android/fastlane/service_account.json.gpg
After this, we will proceed to change our Github actions so they will work with the GitHub secrets to decrypt our files. We start by complementing the action dependencies with the necessary code to decrypt them, and to finish off, we replace the keys for the build and publishing.
1...
2- uses: actions/checkout@v2
3- name: Checkout code and decrypt Android keys
4    run: sh ./.github/scripts/decrypt_android_keys.sh
5    env:
6        RELEASE_KEYSTORE: ${{ secrets.RELEASE_KEYSTORE }}
7        RELEASE_KEYSTORE_PASSPHRASE:
8        ${{ secrets.RELEASE_KEYSTORE_PASSPHRASE }}
9        SERVICE_ACCOUNT: ${{ secrets.SERVICE_ACCOUNT }}
10        SERVICE_ACCOUNT_PASSPHRASE:
11        ${{ secrets.SERVICE_ACCOUNT_PASSPHRASE }}
12...
13 - name: Build and Publish Mobile App
14    run: |
15        cd android
16         fastlane android playstoreInternal
17         RELEASE_KEYSTORE_PASSWORD:
18         ${{secrets.RELEASE_KEYSTORE_PASSWORD}}
19         RELEASE_KEYSTORE_KEY_PASSWORD:
20         ${{secrets.RELEASE_KEYSTORE_KEY_PASSWORD}}
21         RELEASE_KEYSTORE_ALIAS:
22         ${{secrets.RELEASE_KEYSTORE_ALIAS}}
In conclusion
Fastlane is an excellent tool to help you deploy your apps quickly from anywhere and with minimum effort, once the initial configuration is done you don’t need to worry about maintenance, just do your changes and Fastlane will do the rest for you
Other articles
Let's grab a (virtual) cup of coffee.
It's on us. Schedule your free consultation and let's talk about how we can help you.
No matter the challenge,
Untile rises to it.
No matter the problem,
Untile has the solution.
We transform businesses. We transform processes. We transform ideas.
